
今回はAngularのmat-tableに編集ボタンを付けて、編集ボタンからダイアログを開くとダイアログが開き、フォームに入力した情報がテーブルに反映される、というような機能を実装していきたいと思います。
MattableとMatDialogの導入方法については以下の記事で解説しているので、まずそちらを参考にしてください。
【Angular】ダイアログ画面をMat-dialogで実装する
AngularによるWebアプリ開発⑧~Mat-Tableでテーブルを作成する
# コンポーネントを作成する
$ ng generate component edit-table-sample
$ ng generate component edit-dialog
<app-routing.module.ts>
import { NgModule } from "@angular/core";
import { Routes, RouterModule } from "@angular/router";
~~~~
~~~~
import { EditTableSampleComponent } from "./edit-table-sample/edit-table-sample.component"; //これを追加する!

const routes: Routes = [

  { path: "edit-mattable-sample", component: EditTableSampleComponent }, //これを追加!
];

@NgModule({
  imports: [RouterModule.forRoot(routes)],
  exports: [RouterModule],
})
export class AppRoutingModule {}
import { BrowserModule } from "@angular/platform-browser";
import { NgModule } from "@angular/core";
import { AppRoutingModule } from "./app-routing.module";
import { AppComponent } from "./app.component";
~~~~
~~~~
import { EditTableSampleComponent } from "./edit-table-sample/edit-table-sample.component"; //これを追加
import { EditDialogComponent } from "./edit-dialog/edit-dialog.component"; //これを追加

@NgModule({
  declarations: [
    AppComponent,
    ~~~~
    EditTableSampleComponent, //これを追加
    EditDialogComponent,//これを追加
  ],
  imports: [
  ],
  providers: [],
  entryComponents: [EditDialogComponent],//これを追加

})
export class AppModule {}
<edit-table-sample.component.html>
<div style='padding:20px;'>

<table mat-table [dataSource]="dataSource" #mytable class="my-table mat-elevation-z8">

<!-- Id Column -->
<ng-container matColumnDef="id">
<th mat-header-cell *matHeaderCellDef> ID. </th>
<td mat-cell *matCellDef="let element"> {{element.id}} </td>
</ng-container>

<!-- Name Column -->
<ng-container matColumnDef="name">
<th mat-header-cell *matHeaderCellDef> 名前 </th>
<td mat-cell *matCellDef="let element"> {{element.name}} </td>
</ng-container>

<!-- Action Column -->
<ng-container matColumnDef="action">
<th mat-header-cell *matHeaderCellDef> アクション </th>
<td mat-cell *matCellDef="let element" class="action-link">
<a (click)="openDialog('更新',element)"><button mat-raised-button color='primary'>編集</button></a>
<a (click)="openDialog('削除',element)"><button mat-raised-button>削除</button></a>
</td>
</ng-container>
<tr mat-header-row *matHeaderRowDef="displayedColumns"></tr>
<tr mat-row *matRowDef="let row; columns: displayedColumns;"></tr>
</table>
<br /><br />
<button mat-button (click)="openDialog('Add',{})" mat-flat-button color="primary">列を追加する</button>
</div>
<edit-table-sample.component.ts>
import { Component, OnInit, ViewChild } from "@angular/core";
import { MatDialog, MatTable } from "@angular/material";
import { EditDialogComponent } from "../edit-dialog/edit-dialog.component";

export interface UsersData {
  name: string;
  id: number;
}

const ELEMENT_DATA: UsersData[] = [
  { id: 1560608769632, name: "Artificial Intelligence" },
  { id: 1560608796014, name: "Machine Learning" },
  { id: 1560608787815, name: "Robotic Process Automation" },
  { id: 1560608805101, name: "Blockchain" },
];
@Component({
  selector: "app-edit-table-sample",
  templateUrl: "./edit-table-sample.component.html",
  styleUrls: ["./edit-table-sample.component.css"],
})
export class EditTableSampleComponent implements OnInit {
  ngOnInit() {}

  displayedColumns: string[] = ["id", "name", "action"];
  dataSource = ELEMENT_DATA;

  @ViewChild(MatTable, { static: true }) table: MatTable;

  constructor(public dialog: MatDialog) {}

  openDialog(action, obj) {
    obj.action = action;
    const dialogRef = this.dialog.open(EditDialogComponent, {
      width: "250px",
      data: obj,
    });

    dialogRef.afterClosed().subscribe((result) => {
      if (result.event == "Add") {
        this.addRowData(result.data);
      } else if (result.event == "更新") {
        this.updateRowData(result.data);
      } else if (result.event == "削除") {
        this.deleteRowData(result.data);
      }
    });
  }

  addRowData(row_obj) {
    var d = new Date();
    this.dataSource.push({
      id: d.getTime(),
      name: row_obj.name,
    });
    this.table.renderRows();
  }
  updateRowData(row_obj) {
    this.dataSource = this.dataSource.filter((value, key) => {
      if (value.id == row_obj.id) {
        value.name = row_obj.name;
      }
      return true;
    });
  }
  deleteRowData(row_obj) {
    this.dataSource = this.dataSource.filter((value, key) => {
      return value.id != row_obj.id;
    });
  }
}
<edit-dialog.component.ts>
import { Component, OnInit, Inject, Optional } from "@angular/core";
import { MatDialogRef, MAT_DIALOG_DATA } from "@angular/material";

export interface UsersData {
  name: string;
  id: number;
}

@Component({
  selector: "app-edit-dialog",
  templateUrl: "./edit-dialog.component.html",
  styleUrls: ["./edit-dialog.component.css"],
})
export class EditDialogComponent implements OnInit {
  action: string;
  local_data: any;

  constructor(
    public dialogRef: MatDialogRef,
    //@Optional() is used to prevent error if no data is passed
    @Optional() @Inject(MAT_DIALOG_DATA) public data: UsersData
  ) {
    console.log(data);
    this.local_data = { ...data };
    this.action = this.local_data.action;
  }

  doAction() {
    this.dialogRef.close({ event: this.action, data: this.local_data });
  }

  closeDialog() {
    this.dialogRef.close({ event: "Cancel" });
  }

  ngOnInit() {}
}
<edit-dialog.component.html>
<h1 mat-dialog-title>アクション: <strong>{{action}}</strong></h1>
<div mat-dialog-content>
  <mat-form-field *ngIf="action != 'Delete'; else elseTemplate">
    <input placeholder="{{action}} Name" matInput [(ngModel)]="local_data.name">
  </mat-form-field>
  <ng-template #elseTemplate>
    本当に削除しますか? <b>{{local_data.name}}</b>?
  </ng-template>
</div>
<div mat-dialog-actions>
  <button mat-button (click)="doAction()" mat-flat-button color="primary">{{action}}</button>
  <button mat-button (click)="closeDialog()">キャンセル</button>
</div>
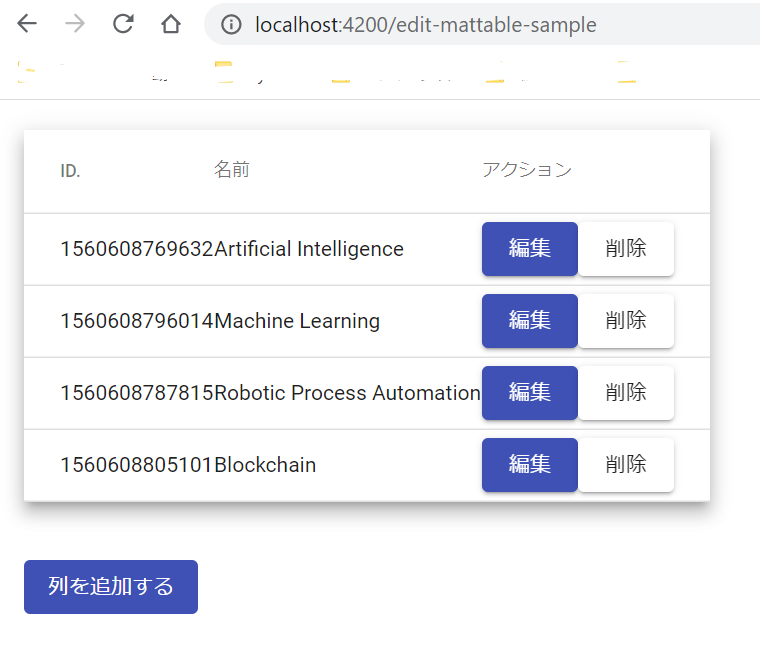
以上のコードを追記した状態でhttp://localhost:4200/edit-mattable-sampleにアクセスすると以下のような状態になっています。
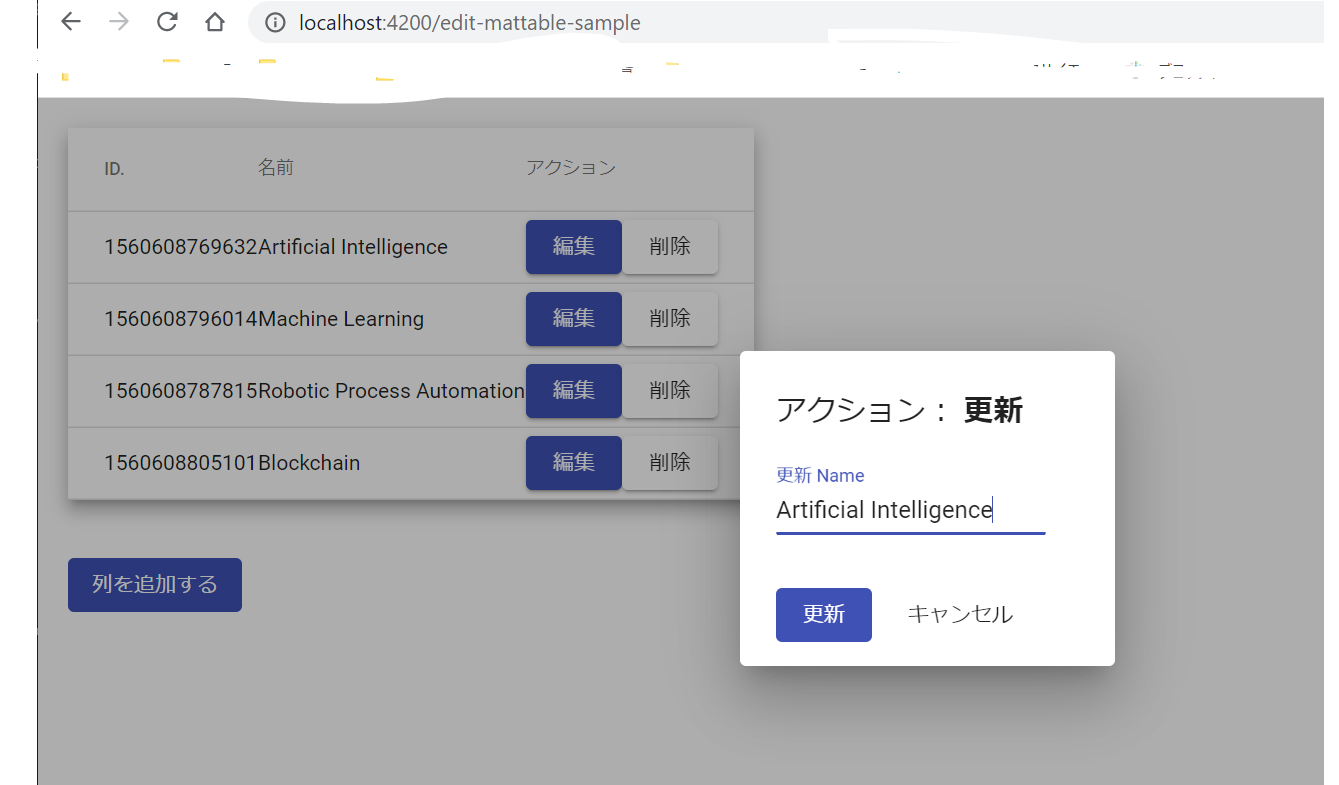
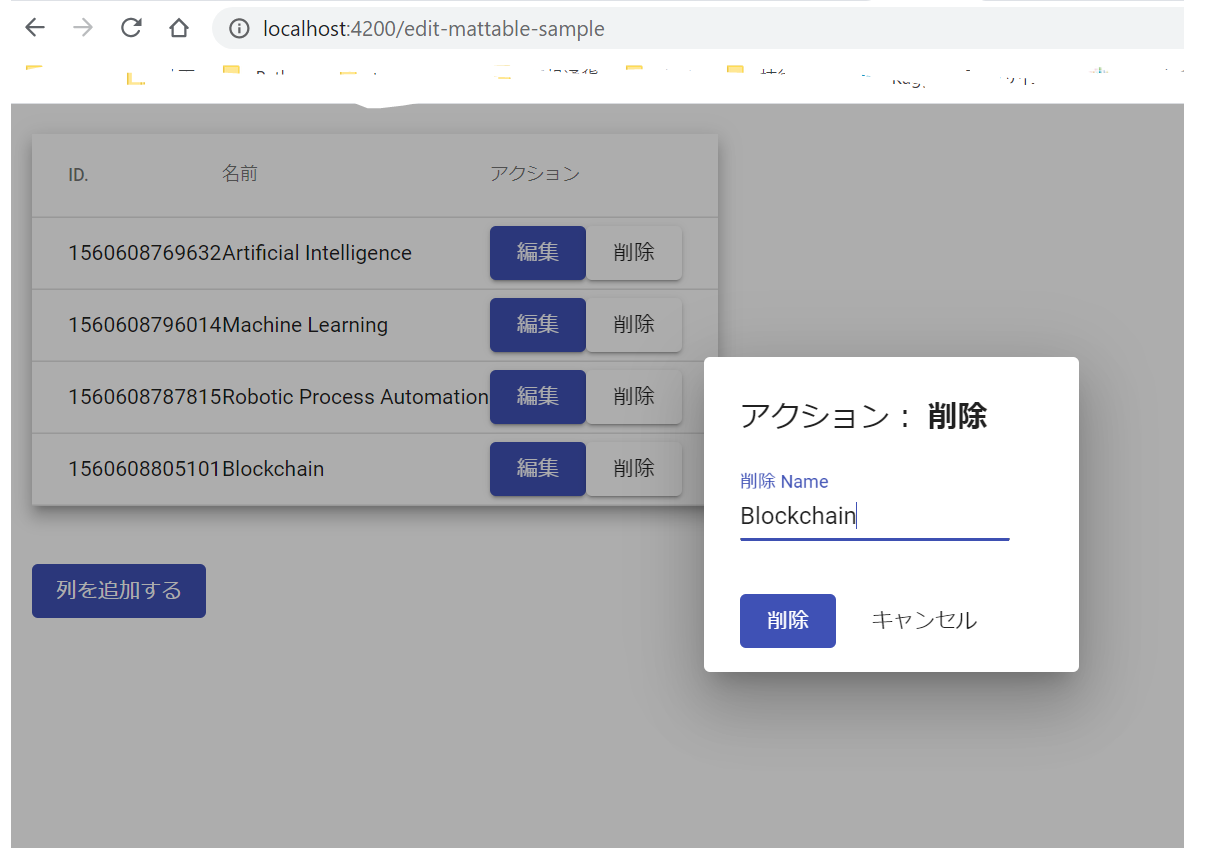
そして、各ボタンをクリックすると以下のようにダイアログが表示されデータを編集・削除することができます。
【Githubのサンプルコード】
参照:https://www.freakyjolly.com/angular-material-table-operations-using-dialog/#.XtFZ52j7THo
関連記事:【Angular】Mat-Tableでヘッダーが複数行になるテーブルを作ってみる
関連記事:【Angular】Mattableの各ヘッダー列の幅を画面幅に合わせて自動調整する
関連記事:AngularによるWebアプリ開発⑧~Mat-Tableでテーブルを作成する


コメント