
シリーズ記事一覧
・Angularでwebアプリを作ってみる①~環境構築とコンポーネント作成
・AngularによるWebアプリ開発②~Angular Material をインストールしてマテリアルデザインを実装する
開発環境
- Angular ver9.0
- Nodejs ver13.0
ngIf ディレクティブの使い方
AngularにはngIfというディレクティブが標準で用意されています。ngifはIf文のようなものでAngularでWebアプリを作る際によく使われる使い方としてはif文の中身がtrueの場合は特定の要素を表示する、反対にflaseの場合は表示しないといった設定ができる機能です。
この仕組みを利用して特定の要素をクリックなどのアクションで表示/非表示を切り替えたい場合によく使われます。これだけだと漠然としているので実際に使った例を紹介していきます。
まずNgifテスト用のコンポーネントを作成しておきます。
# 新規コンポーネントを作成
$ ng generate component ngif-sample
ngIfを使用するには、app.module.tsで、BrowserModuleをimportしておく必要があります。angularのバージョンによっては既にng newコマンドを実行したときに自動で書き込まれているので、記述があることだけ確認すれば大丈夫です。
[app.module.ts]
import { BrowserModule } from '@angular/platform-browser';
import { NgModule } from '@angular/core';

import { AppRoutingModule } from './app-routing.module';
import { AppComponent } from './app.component';
import { NgifSampleComponent } from './ngif-sample/ngif-sample.component';

@NgModule({
  declarations: [
    AppComponent,
    NgifSampleComponent
  ],
  imports: [
    BrowserModule,
    AppRoutingModule
  ],
  providers: [],
  bootstrap: [AppComponent]
})
export class AppModule { }
次にtsファイルを記述していきます。ngif-sample.component.tsに以下のように記述します。
[ngif-sample.component.ts]
import { Component, OnInit } from "@angular/core";

@Component({
  selector: "app-ngif-sample",
  templateUrl: "./ngif-sample.component.html",
  styleUrls: ["./ngif-sample.component.css"],
})

export class NgifSampleComponent implements OnInit {
  flg1: boolean;

  constructor() {
      this.flg1 = true;
      }
  ngOnInit() {}
}
tsファイルが記述できたら次はhtmlを編集していきます。
[ngif-sample.component.html]
<hr />
<div *ngIf="flg1">
  <p>flgがTrueだとこれが表示されます</p>
</div>
<hr />
実行結果

else文による条件分岐
ngifはプログラミング言語のif文と同じようにelseによる条件分岐も可能です。先ほどのngif-sample.component.tsに以下のように追記します。
[ngif-sample.component.ts]
~~
export class NgifSampleComponent implements OnInit {
  flg1: boolean;
  flg2: boolean; //追記

  constructor() {
    this.flg1 = true;
    this.flg2 = false; //追記
  }

  ngOnInit() {}
}
else時の表示内容は<ng-template>タグを使用して設定します。
[ngif-sample.component.html]
<div *ngIf='flg2; else Statement'>
  <p>{{flg2}}</p>
</div>
<ng-template #Statement>
  <p>falseの時に表示される内容です</p>
</ng-template>
<hr />
*ngIf=’flg; else Statement’と指定しておくことで変数flg2がfalseだった場合、<ng-template #Statement>の中身を表示するという風にできます。
ボタンクリックとngifで要素の表示非表示を切り替える
さてここからが本題です。Ngifで変数の中身がTrueだったら表示、Falseだったら非表示という機能を利用して、ボタンクリックなどの特定の操作で変数のTrue/Falseを切り替えることで特定の要素の表示/非表示を切り替えることができます。
まず[ngif-sample.component.ts]に以下のよう内容を追記します。
[ngif-sample.component.ts]
~~
export class NgifSampleComponent implements OnInit {
  flg1: boolean;
  flg2: boolean;
  flg3: boolean; //追記

  constructor() {
    this.flg1 = true;
    this.flg2 = false;
    this.flg3 = true; //追記
  }

  ngOnInit() {}

  doClick() {
    // this.flg3 = !this.flg3;(これでも代用可)
    // flg3がTrueならFalse、FlaseならTrueに置き換える処理
    if (this.flg3 == true) {
        this.flg3 = false;
        } else {
        this.flg3 = true;
        }
    }
}
[ngif-sample.component.html]
<button (click)="doClick()">
ボタン
</button>
<div *ngIf="flg3">
<p>ボタンをクリックするとこのメッセージが表示されます。もう一度クリックすると再び非表示になります。</p>
</div>
<hr />
以上のコードを追記すると以下のような画面になります。
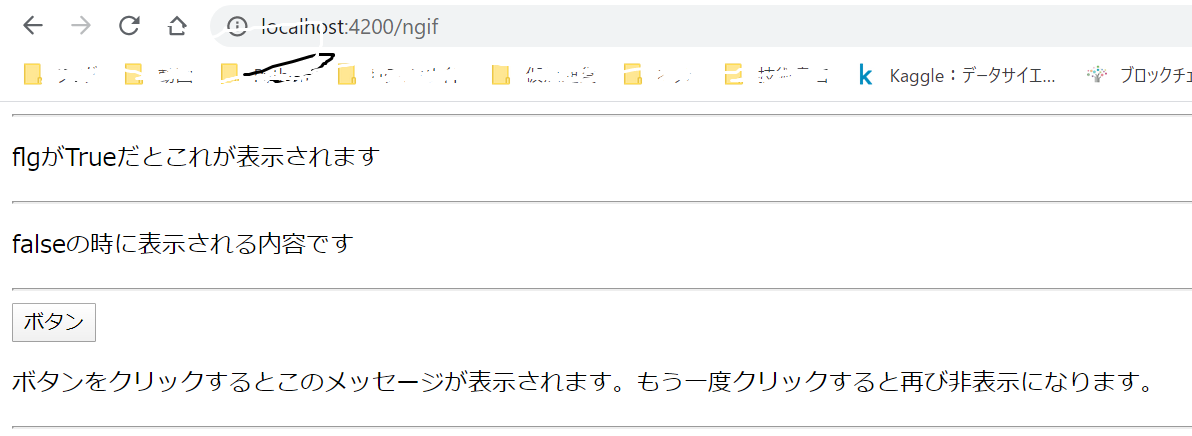
簡単に説明すると、ボタンをクリックすると、doClick()という関数が実行されます。
doClick()で行われる処理はflg3がTrueならflase、flaseならTrueと中身を逆に書き換えるという処理を指定しています。ちなみにこの処理を一行でおしゃれにかくとこう書けます。
this.flg3 = !this.flg3;
これによってボタンをクリックするたびにngif=の中身がTrue⇔flaseと切り替わるので、要素の表示/非表示が切り替わるという流れです。
クリックするごとにdocclick()が実行→flg3のTrue⇔Falseが切り替わる→ngifによって要素の表示/非表示が切り替わるという流れです
終わり
以上がngIfの基本的な使い方です。サンプルコードはGitに配置しています。
次はNgifと同じくらい重要なngforの使い方について紹介していきます。
次の記事→
オススメ参考書

コメント